
Visual regression testing has become essential in modern web development, ensuring that CSS changes don’t break the visual appearance of your website. As applications grow more complex, manual testing becomes impractical, making automated visual testing tools crucial for maintaining design consistency.
What is Visual Regression Testing?
Visual regression testing compares screenshots of your web pages before and after code changes to detect unintended visual differences. Unlike functional tests that verify behavior, visual tests ensure your interface looks exactly as intended across different browsers, devices, and screen resolutions.
This testing approach captures pixel-perfect comparisons, highlighting even minor changes in layout, colors, fonts, or spacing that might otherwise go unnoticed during manual reviews.
Why Visual Regression Testing Matters
Modern web applications face several challenges that make visual testing critical:
- CSS Cascade Complexity: Changes in one component can unexpectedly affect others through inheritance and specificity
- Responsive Design: Multiple breakpoints and device variations multiply testing complexity
- Cross-Browser Differences: Rendering engines interpret CSS differently across browsers
- Dynamic Content: JavaScript-driven interfaces create numerous visual states to validate
- Team Collaboration: Multiple developers working on shared stylesheets increase risk of conflicts
Top Visual Regression Testing Tools
1. Percy by BrowserStack
Percy offers comprehensive visual testing with excellent CI/CD integration and cross-browser support. It provides pixel-perfect comparisons with intelligent diff algorithms.
Key Features:
- Automatic screenshot capture across multiple browsers
- Smart diff algorithms that ignore anti-aliasing differences
- Integration with popular frameworks (React, Angular, Vue)
- Responsive testing across different viewports
- Team collaboration with review workflows
Implementation Example:
npm install --save-dev @percy/cli @percy/puppeteer

// percy.config.js
module.exports = {
  version: 2,
  discovery: {
    allowedHostnames: ['localhost'],
    launchOptions: {
      headless: true
    }
  },
  snapshot: {
    widths: [375, 768, 1280],
    minHeight: 1024
  }
}

// test file
const { percySnapshot } = require('@percy/puppeteer');

await page.goto('http://localhost:3000');
await percySnapshot(page, 'Homepage');
2. Chromatic
Specifically designed for Storybook, Chromatic excels in component-level visual testing and provides excellent integration with design systems.
Setup Process:
npm install --save-dev chromatic

// package.json
{
  "scripts": {
    "chromatic": "chromatic --project-token=PROJECT_TOKEN"
  }
}

// .storybook/main.js
module.exports = {
  stories: ['../src/**/*.stories.@(js|jsx|ts|tsx)'],
  addons: [
    '@storybook/addon-essentials',
    'chromatic/isChromatic'
  ]
}
Advantages: Seamless Storybook integration, component isolation, design system workflow
Best for: Teams using Storybook for component development
3. Applitools Eyes
Powered by AI, Applitools Eyes provides advanced visual testing with machine learning capabilities to reduce false positives and improve accuracy.
Implementation:
npm install @applitools/eyes-puppeteer

const { Eyes, Target } = require('@applitools/eyes-puppeteer');

const eyes = new Eyes();
eyes.setApiKey('YOUR_API_KEY');

// In your test
await eyes.open(page, 'App Name', 'Test Name');
await eyes.check('Homepage', Target.window());
await eyes.close();
AI Features:
- Intelligent ignore regions for dynamic content
- Layout-based matching that adapts to minor shifts
- Content-based matching for text variations
4. BackstopJS
Open-source tool offering flexibility and customization for teams preferring self-hosted solutions.
Configuration Example:
// backstop.json
{
  "id": "backstop_default",
  "viewports": [
    {"label": "phone", "width": 375, "height": 667},
    {"label": "tablet", "width": 768, "height": 1024},
    {"label": "desktop", "width": 1280, "height": 800}
  ],
  "scenarios": [
    {
      "label": "Homepage",
      "url": "http://localhost:3000",
      "hideSelectors": [".dynamic-content"],
      "removeSelectors": [".ads"],
      "delay": 1000
    }
  ],
  "paths": {
    "bitmaps_reference": "backstop_data/bitmaps_reference",
    "bitmaps_test": "backstop_data/bitmaps_test",
    "html_report": "backstop_data/html_report"
  }
}
Commands:
backstop reference  # Create reference screenshots
backstop test       # Run tests against references
backstop approve    # Approve new screenshots as references
5. Playwright Visual Testing
Built into Playwright, offering native visual testing capabilities with excellent performance and reliability.
Test Implementation:
// playwright.config.js
module.exports = {
  use: {
    // Global test settings
    screenshot: 'only-on-failure',
  },
  projects: [
    {
      name: 'chromium',
      use: { ...devices['Desktop Chrome'] },
    },
    {
      name: 'firefox',
      use: { ...devices['Desktop Firefox'] },
    },
    {
      name: 'webkit',
      use: { ...devices['Desktop Safari'] },
    },
  ],
};

// test file
test('visual comparison', async ({ page }) => {
  await page.goto('http://localhost:3000');
  await expect(page).toHaveScreenshot('homepage.png');

  // Specific element screenshot
  await expect(page.locator('.header')).toHaveScreenshot('header.png');
});
Interactive Tool Comparison
| Tool | Pricing | Cross-Browser | CI/CD | Best For |
|---|---|---|---|---|
| Percy | 💰💰 | ✅ | ✅ | Enterprise teams |
| Chromatic | 💰 | ✅ | ✅ | Storybook users |
| Applitools | 💰💰💰 | ✅ | ✅ | AI-powered testing |
| BackstopJS | 🆓 | ❌ | ✅ | Budget-conscious teams |
| Playwright | 🆓 | ✅ | ✅ | End-to-end testing |
Implementation Best Practices
1. Establish Baseline Screenshots
Create comprehensive baseline screenshots covering all critical user journeys, components, and responsive breakpoints. Ensure baselines represent the intended design accurately.
Baseline Strategy:
- Capture screenshots in stable, controlled environments
- Include all major user interface states
- Test across primary supported browsers and devices
- Document baseline creation process for team consistency
2. Handle Dynamic Content
Dynamic elements like timestamps, user-generated content, or advertisements can cause false positives. Implement strategies to manage these elements:
// Example: Hiding dynamic elements
const hideSelectors = [
  '.timestamp',
  '.user-avatar',
  '.advertisement',
  '.live-chat'
];

// Mock dynamic data
await page.evaluate(() => {
  // Replace timestamps with fixed values
  document.querySelectorAll('.timestamp').forEach(el => {
    el.textContent = '2024-01-01 12:00:00';
  });
});
3. Optimize Test Performance
Visual tests can be slower than functional tests. Optimize performance through:
- Parallel execution: Run tests concurrently across different browsers
- Selective testing: Focus on critical paths and components most likely to break
- Smart scheduling: Run full visual suites on major releases, subset on feature branches
- Image optimization: Use appropriate compression for reference images
4. CI/CD Integration
Integrate visual testing into your deployment pipeline effectively:
# GitHub Actions example
name: Visual Regression Tests
on: [push, pull_request]

jobs:
  visual-tests:
    runs-on: ubuntu-latest
    steps:
      - uses: actions/checkout@v3
      - uses: actions/setup-node@v3
        with:
          node-version: 18

      - name: Install dependencies
        run: npm ci

      - name: Build application
        run: npm run build

      - name: Start application
        run: npm start &

      - name: Wait for application
        run: npx wait-on http://localhost:3000

      - name: Run visual tests
        run: npm run test:visual
        env:
          PERCY_TOKEN: ${{ secrets.PERCY_TOKEN }}
Advanced Testing Strategies
Component-Level Testing
Test individual components in isolation to quickly identify which specific elements are affected by changes:
// Storybook story for visual testing
export default {
  title: 'Components/Button',
  component: Button,
  parameters: {
    chromatic: {
      viewports: [320, 768, 1200],
      pauseAnimationAtEnd: true
    }
  }
};

export const Primary = {
  args: {
    primary: true,
    label: 'Button'
  }
};

export const Secondary = {
  args: {
    label: 'Button'
  }
};

export const Large = {
  args: {
    size: 'large',
    label: 'Button'
  }
};
Cross-Browser Testing
Ensure consistent appearance across different browsers and versions:
Browser Testing Matrix:
- Chrome: Latest and previous major version
- Firefox: Latest and ESR versions
- Safari: Latest on macOS and iOS
- Edge: Latest Chromium-based version
Responsive Design Testing
Validate layouts across different viewport sizes and orientations:
// Playwright responsive testing
const viewports = [
  { width: 375, height: 667, name: 'iPhone SE' },
  { width: 768, height: 1024, name: 'iPad' },
  { width: 1280, height: 720, name: 'Desktop' },
  { width: 1920, height: 1080, name: 'Large Desktop' }
];

for (const viewport of viewports) {
  await page.setViewportSize(viewport);
  await expect(page).toHaveScreenshot(`homepage-${viewport.name}.png`);
}
Common Challenges and Solutions
False Positives
Minimize false positives that waste development time:
- Anti-aliasing differences: Use tools with smart diff algorithms
- Font rendering: Standardize font loading and fallbacks
- Image loading: Ensure all images load completely before screenshots
- Animations: Disable or control animations during testing
Test Maintenance
Keep tests maintainable as your application evolves:
Maintenance Strategies:
- Regular baseline updates following design changes
- Automated cleanup of obsolete test scenarios
- Version control for reference images
- Clear documentation of test coverage and scenarios
Measuring Visual Testing ROI
Track metrics to demonstrate the value of visual regression testing:
- Bug Detection Rate: Number of visual bugs caught before production
- Time Savings: Reduction in manual QA time
- Deployment Confidence: Faster release cycles due to automated validation
- Customer Satisfaction: Fewer visual bugs reported by users
Future of Visual Testing
Visual regression testing continues evolving with new technologies and approaches:
AI and Machine Learning
Advanced algorithms are improving accuracy and reducing false positives through intelligent image comparison and pattern recognition.
Mobile-First Testing
Tools are expanding mobile testing capabilities with better device emulation and touch interaction simulation.
Accessibility Integration
Visual testing tools are beginning to incorporate accessibility checks, ensuring compliance alongside visual accuracy.
Conclusion
Visual regression testing has become indispensable for maintaining high-quality web interfaces. By implementing the right combination of tools and strategies, development teams can catch visual bugs early, maintain design consistency, and deploy with confidence.
Choose tools based on your team’s specific needs: Percy for comprehensive enterprise solutions, Chromatic for Storybook-based workflows, Applitools for AI-powered accuracy, BackstopJS for budget-conscious teams, or Playwright for integrated end-to-end testing.
Remember that successful visual testing requires more than just tools—it demands proper baseline management, strategic test coverage, and continuous refinement of your testing approach. Start small, iterate based on results, and gradually expand your visual testing coverage as your team becomes comfortable with the workflow.
The investment in visual regression testing pays dividends through reduced manual testing overhead, increased deployment confidence, and better user experiences. As web interfaces become increasingly complex, automated visual testing transitions from nice-to-have to essential for professional web development.
Related Posts

CSS Debugging: Master Browser DevTools for Efficient Web Development
CSS debugging can be one of the most challenging aspects of web development, especially when dealing with complex layouts, responsive...

CSS Feature Detection: Complete Guide to @supports Rule and Browser Compatibility
CSS feature detection is a crucial technique that allows developers to write robust, future-proof stylesheets that gracefully handle browser compatibility...
CSS Testing: Complete Guide to Cross-Browser Compatibility Testing
Cross-browser compatibility testing is one of the most critical aspects of modern web development. With users accessing websites through dozens...

CSS Validation: Complete Guide to W3C CSS Validator for Error-Free Stylesheets
What is CSS Validation? CSS validation is the process of checking your Cascading Style Sheets (CSS) code against the official...
CSS Performance Metrics: Complete Guide to CLS, FCP, LCP Optimization
Website performance directly impacts user experience, search rankings, and conversion rates. CSS plays a crucial role in three critical performance...
CSS Refactoring: Complete Guide to Modernizing Legacy Stylesheets
Legacy CSS codebases can become a significant burden on development teams, slowing down feature delivery and creating maintenance nightmares. CSS...

CSS Graceful Degradation: Essential Fallback Strategies for Modern Web Development
CSS graceful degradation is a fundamental web development strategy that ensures your website remains functional and accessible across all browsers,...
CSS display Property: CSS Display
Understanding the CSS display Property: A Comprehensive Guide The display property in CSS is a cornerstone for controlling the layout...
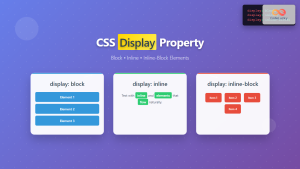
CSS Display Property: Complete Guide to Block, Inline, and Inline-Block Elements
The CSS display property is one of the most fundamental concepts in web development, controlling how elements are rendered and...
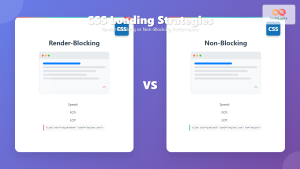
CSS Loading Strategies: Complete Guide to Render-Blocking and Non-Blocking Performance Optimization
CSS loading strategies are fundamental to web performance optimization, directly impacting user experience and search engine rankings. Understanding how different...

CSS Specificity: Complete Guide to Style Priority and Cascade Resolution
CSS specificity is one of the most crucial concepts every web developer must master. It determines which styles the browser...

CSS Style filter Property: CSS Filter
CSS filter Property: Enhance Your Web Graphics The CSS filter property provides powerful visual effects to elements like images, backgrounds,...


