
Understanding the offsetLeft Property in HTML
The offsetLeft property in HTML DOM is a read-only property that returns the distance (in pixels) from the left border of the current element to the left border of its offsetParent node. This property is incredibly useful for determining the exact position of an element within the document, particularly when dealing with dynamic layouts or interactive elements.
What is offsetLeft?
The offsetLeft property provides a numerical value representing the horizontal offset of an element relative to its offsetParent. The offsetParent is the nearest ancestor element that is positioned (i.e., it has a position style property other than static). If no such ancestor exists, the offsetParent is the document’s root element (<html>).
Purpose of offsetLeft
The primary purpose of offsetLeft is to allow developers to:
- Determine the precise horizontal position of an element within the document layout.
- Calculate relative positions between elements.
- Implement dynamic positioning and animation effects.
- Create custom layout algorithms based on element positions.
Syntax
The syntax for accessing the offsetLeft property is straightforward:
let leftOffset = element.offsetLeft;
Here, element is a reference to the HTML element you want to get the offset from, and leftOffset will be a number representing the distance in pixels.
Return Value
The offsetLeft property returns an integer value representing the number of pixels. If the element or its offsetParent is not rendered (e.g., display: none), offsetLeft returns 0.
Practical Examples
Let’s dive into some practical examples to illustrate how the offsetLeft property can be used in real-world scenarios.
Basic Example: Retrieving offsetLeft
This example demonstrates how to retrieve and display the offsetLeft value of a simple <div> element.
<div
  id="myDivOffsetLeft1"
  style="position: absolute; left: 50px; top: 50px; width: 200px; height: 100px; border: 1px solid black;"
>
  This is a div element.
</div>
<p id="offsetLeftValue1"></p>

<script>
  const divElementOffsetLeft1 = document.getElementById("myDivOffsetLeft1");
  const offsetLeftValue1 = document.getElementById("offsetLeftValue1");

  const leftOffset1 = divElementOffsetLeft1.offsetLeft;
  offsetLeftValue1.textContent = "Offset Left: " + leftOffset1 + "px";
</script>
Output:
The paragraph element will display: “Offset Left: 50px”.
Example with Different Positioning
This example demonstrates how the offsetLeft value changes based on the position style of the parent element.
<div
  id="parentDivOffsetLeft2"
  style="position: relative; width: 300px; height: 200px; border: 1px solid black;"
>
  <div
    id="childDivOffsetLeft2"
    style="position: absolute; left: 20px; top: 20px; width: 100px; height: 50px; background-color: lightblue;"
  >
    Child Div
  </div>
</div>
<p id="offsetLeftValue2"></p>

<script>
  const childDivElementOffsetLeft2 = document.getElementById(
    "childDivOffsetLeft2"
  );
  const offsetLeftValue2 = document.getElementById("offsetLeftValue2");

  const leftOffset2 = childDivElementOffsetLeft2.offsetLeft;
  offsetLeftValue2.textContent = "Offset Left: " + leftOffset2 + "px";
</script>
Output:
The paragraph element will display: “Offset Left: 20px”. This is because the offsetParent of the child div is the parent div, which is relatively positioned.
Dynamic Example: Updating offsetLeft on Button Click
This example shows how to dynamically update the offsetLeft value of an element when a button is clicked.
<div
  id="movingDivOffsetLeft3"
  style="position: absolute; left: 20px; top: 20px; width: 100px; height: 50px; background-color: lightgreen;"
>
  Move Me!
</div>
<button id="moveButtonOffsetLeft3">Move Right</button>
<p id="offsetLeftValue3"></p>

<script>
  const movingDivOffsetLeft3 = document.getElementById("movingDivOffsetLeft3");
  const moveButtonOffsetLeft3 = document.getElementById("moveButtonOffsetLeft3");
  const offsetLeftValue3 = document.getElementById("offsetLeftValue3");

  moveButtonOffsetLeft3.addEventListener("click", () => {
    let currentOffset = movingDivOffsetLeft3.offsetLeft;
    movingDivOffsetLeft3.style.left = currentOffset + 10 + "px";

    offsetLeftValue3.textContent =
      "Offset Left: " + movingDivOffsetLeft3.offsetLeft + "px";
  });

  offsetLeftValue3.textContent =
    "Offset Left: " + movingDivOffsetLeft3.offsetLeft + "px";
</script>
Each time the button is clicked, the offsetLeft of the div element will increase by 10 pixels, and the paragraph element will display the updated value.
Canvas Example: Using offsetLeft for Positioning
This example demonstrates how to use offsetLeft to position elements relative to a canvas.
<canvas
  id="myCanvasOffsetLeft4"
  width="300"
  height="200"
  style="border: 1px solid black;"
></canvas>
<div
  id="canvasRelativeDivOffsetLeft4"
  style="position: absolute; background-color: lightcoral; width: 50px; height: 30px;"
>
  Div on Canvas
</div>

<script>
  const canvasOffsetLeft4 = document.getElementById("myCanvasOffsetLeft4");
  const canvasRelativeDivOffsetLeft4 = document.getElementById(
    "canvasRelativeDivOffsetLeft4"
  );

  // Set initial position relative to the canvas
  canvasRelativeDivOffsetLeft4.style.left = canvasOffsetLeft4.offsetLeft + 20 + "px";
  canvasRelativeDivOffsetLeft4.style.top = canvasOffsetLeft4.offsetTop + 20 + "px";
</script>
This code positions the div element 20 pixels from the top-left corner of the canvas.
Use Cases
- Dynamic Layouts: Adjusting element positions based on screen size or user interactions.
- Tooltips: Positioning tooltips relative to their associated elements.
- Drag and Drop: Calculating element positions during drag and drop operations.
- Custom Scrollbars: Implementing custom scrollbar behavior based on element offsets.
- Interactive Games: Creating interactive game elements and character movements.
Important Considerations
- Read-Only Property:
offsetLeftis a read-only property; you cannot set its value directly. To change an element’s horizontal position, modify itsleftstyle property. offsetParent: The value ofoffsetLeftis relative to the element’soffsetParent. Ensure you understand theoffsetParenthierarchy to accurately interpret theoffsetLeftvalue.- Hidden Elements: If the element or its
offsetParentis hidden (display: none),offsetLeftwill return0. - Cross-Browser Compatibility:
offsetLeftis widely supported across all modern browsers, but it’s always a good practice to test your code on different browsers to ensure consistency.
Conclusion
The offsetLeft property is a fundamental tool for web developers needing to determine the precise horizontal position of HTML elements. By understanding how offsetLeft works and how it relates to the offsetParent, you can create dynamic and interactive web applications with greater precision and control.
Related Posts

HTML Element offsetTop Property: Element’s Distance to Top
HTML Element offsetTop Property: Understanding the Element's Distance to the Top The offsetTop property in HTML DOM provides the distance...

HTML Element offsetParent Property: Element Offset Parent
HTML Element offsetParent Property: Understanding Element Offset Parent The offsetParent property in HTML DOM is a read-only property that returns...

HTML Element offsetWidth Property: Element Offset Width
Understanding the offsetWidth Property in HTML Elements The offsetWidth property is a read-only property of HTML elements in the DOM...
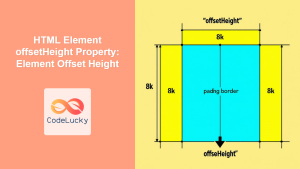
HTML Element offsetHeight Property: Element Offset Height
HTML Element offsetHeight Property: Understanding Element Height The offsetHeight property is a read-only property in JavaScript that provides the height...

HTML Element clientHeight Property: Element Height
HTML Element clientHeight Property: Understanding Element Height The clientHeight property is a read-only property of an HTML element in the...

CSS Style left Property: CSS Left
CSS left Property: A Comprehensive Guide The CSS left property is a fundamental tool for web developers, enabling precise horizontal...
CSS Style right Property: CSS Right
Understanding the CSS right Property The CSS right property plays a crucial role in positioning elements within a web page....
CSS Style outlineOffset Property: CSS Outline Offset
CSS outline-offset Property: Comprehensive Guide The CSS outline-offset property specifies the space between an outline and the edge or border...
CSS Relative Positioning: Master Element Offset and Layout Control
Understanding CSS Relative Positioning CSS relative positioning is a fundamental layout technique that allows you to move elements from their...
CSS Top, Right, Bottom, Left: Complete Guide to Positioning Offset Properties
CSS positioning offset properties—top, right, bottom, and left—are fundamental tools for precisely controlling element placement on web pages. These properties...
CSS position Property: Mastering Layouts in CSS
Understanding the CSS position Property: A Comprehensive Guide The position property in CSS is a fundamental tool for controlling the...
CSS Style top Property: CSS Top
Understanding the CSS top Property: A Comprehensive Guide The top property in CSS is used to specify the vertical position...


