
The route command in Linux has been a fundamental tool for network administrators to view and manipulate the kernel’s IP routing table. While this command has been deprecated in favor of the more modern ip command, understanding its functionality remains crucial for system administrators working with legacy systems or preparing for certification exams.
What is the route Command?
The route command is part of the net-tools package that allows users to display and modify the kernel’s IP routing table. This table determines how network packets are forwarded between different network interfaces and destinations. The routing table contains information about network destinations, gateways, and network interfaces.
ip route command from the iproute2 package is the recommended replacement.
Basic Syntax and Options
The basic syntax of the route command follows this pattern:
route [options] [add|del] [target] [netmask Nm] [gw GW] [metric N] [dev If]Common Options
-n: Show numerical addresses instead of resolving hosts-v: Verbose output-e: Use netstat format for displaying routing table-A family: Use specified address family (inet, inet6)-C: Display kernel routing cache
Command Actions
add: Add a new routedel: Delete an existing route-host: Target is a host-net: Target is a network
Viewing the Routing Table
The most common use of the route command is to display the current routing table:
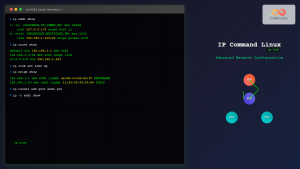
$ route
Kernel IP routing table
Destination     Gateway         Genmask         Flags Metric Ref    Use Iface
default         192.168.1.1     0.0.0.0         UG    100    0        0 eth0
192.168.1.0     0.0.0.0         255.255.255.0   U     100    0        0 eth0
192.168.1.1     0.0.0.0         255.255.255.255 UH    100    0        0 eth0
For numerical output without hostname resolution:
$ route -n
Kernel IP routing table
Destination     Gateway         Genmask         Flags Metric Ref    Use Iface
0.0.0.0         192.168.1.1     0.0.0.0         UG    100    0        0 eth0
192.168.1.0     0.0.0.0         255.255.255.0   U     100    0        0 eth0
192.168.1.1     0.0.0.0         255.255.255.255 UH    100    0        0 eth0
Understanding Route Table Fields
- Destination: The target network or host
- Gateway: The gateway IP address (0.0.0.0 means no gateway needed)
- Genmask: The network mask for the destination
- Flags: Route flags (U=Up, G=Gateway, H=Host, etc.)
- Metric: Distance to target (lower is preferred)
- Ref: Number of references to this route
- Use: Count of lookups for this route
- Iface: Network interface used for this route
Adding Routes
Adding a Default Gateway
To add a default gateway (route for all traffic):
$ sudo route add default gw 192.168.1.1This command adds a default route through the gateway 192.168.1.1. All traffic not matching other specific routes will use this gateway.
Adding a Network Route
To add a route to a specific network:
$ sudo route add -net 192.168.2.0 netmask 255.255.255.0 gw 192.168.1.10This adds a route to the 192.168.2.0/24 network through gateway 192.168.1.10.
Adding a Host Route
To add a route to a specific host:
$ sudo route add -host 10.0.0.5 gw 192.168.1.10This creates a specific route for the host 10.0.0.5 through gateway 192.168.1.10.
Adding Route Through Interface
To add a route directly through a network interface:
$ sudo route add -net 172.16.0.0 netmask 255.255.0.0 dev eth1Deleting Routes
Deleting Default Gateway
$ sudo route del defaultTo delete a specific default gateway:
$ sudo route del default gw 192.168.1.1Deleting Network Routes
$ sudo route del -net 192.168.2.0 netmask 255.255.255.0Deleting Host Routes
$ sudo route del -host 10.0.0.5Advanced Examples
Multiple Gateway Configuration
Setting up multiple gateways for different networks:
# Add route for internal network through first gateway
$ sudo route add -net 10.0.0.0 netmask 255.0.0.0 gw 192.168.1.1

# Add route for DMZ network through second gateway
$ sudo route add -net 172.16.0.0 netmask 255.240.0.0 gw 192.168.1.2

# Verify routes
$ route -n
Setting Route Metrics
Adding routes with specific metrics for load balancing:
$ sudo route add default gw 192.168.1.1 metric 100
$ sudo route add default gw 192.168.1.2 metric 200
Route Flags Explanation
Understanding the flags in the routing table:
- U: Route is up
- G: Route uses a gateway
- H: Route is to a host (not a network)
- R: Route was set up by the routing daemon
- D: Route was set up dynamically by a redirect
- M: Route was modified by a redirect
- A: Route was installed by addrconf
- C: Route was cached
- !: Route is rejected
Troubleshooting with route Command
Common Network Issues
Check if default gateway is configured:
$ route -n | grep '^0.0.0.0'
0.0.0.0         192.168.1.1     0.0.0.0         UG    100    0        0 eth0
Verify specific network routes:
$ route -n | grep '192.168.2'Route Cache Information
Display kernel routing cache:
$ route -CModern Alternative: ip Command
Since the route command is deprecated, here are equivalent ip command alternatives:
Viewing Routes
# route -n equivalent
$ ip route show

# More detailed information
$ ip route show table all
Adding Routes
# Add default gateway
$ sudo ip route add default via 192.168.1.1

# Add network route
$ sudo ip route add 192.168.2.0/24 via 192.168.1.10

# Add host route
$ sudo ip route add 10.0.0.5/32 via 192.168.1.10
Deleting Routes
# Delete default gateway
$ sudo ip route del default

# Delete network route
$ sudo ip route del 192.168.2.0/24
Best Practices and Security Considerations
Route Configuration Best Practices
- Always backup current routing configuration before making changes
- Use specific network masks to avoid routing conflicts
- Document route changes for future reference
- Test connectivity after route modifications
- Use metrics appropriately for load balancing scenarios
Security Implications
- Incorrect routing can lead to traffic interception
- Always verify route destinations and gateways
- Monitor for unauthorized route changes
- Implement proper access controls for route modification
Common Errors and Solutions
Permission Denied
Error: SIOCADDRT: Operation not permitted
Solution: Use sudo for route modifications
Network Unreachable
Error: SIOCADDRT: Network is unreachable
Solution: Ensure the gateway is reachable and interfaces are up
File Exists Error
Error: SIOCADDRT: File exists
Solution: Route already exists, delete existing route first
Migration to ip Command
As the route command is deprecated, system administrators should migrate to using the ip command. The ip command provides more features, better performance, and is actively maintained. Here’s a quick migration reference:
Conclusion
While the route command has been deprecated, understanding its functionality remains valuable for Linux system administrators. The command provides essential network routing capabilities that form the foundation of network configuration in Linux systems. However, modern systems should utilize the ip command from the iproute2 package for better performance, enhanced features, and continued support.
For production environments and new deployments, always prefer the ip command over the deprecated route command. The transition ensures compatibility with modern Linux distributions and access to advanced networking features not available in the legacy net-tools package.
Related Posts
ip Command Linux: Complete Guide to Advanced Network Configuration and Management
The ip command is one of the most powerful and versatile networking tools in Linux, serving as the modern replacement...
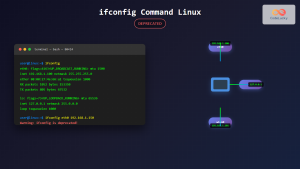
ifconfig Command Linux: Complete Guide to Network Interface Configuration (Deprecated)
The ifconfig (interface configuration) command has been a cornerstone of Linux network administration for decades. While officially deprecated in favor...
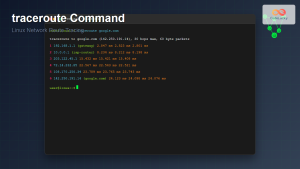
traceroute Command Linux: Complete Network Route Tracing Guide
The traceroute command is an essential network diagnostic tool in Linux that traces the path packets take from your computer...
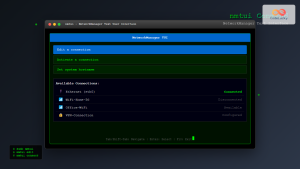
nmtui Command Linux: Complete Guide to NetworkManager Text User Interface
The nmtui (NetworkManager Text User Interface) command is a powerful, menu-driven tool that provides an intuitive way to configure network...

iptables Command Linux: Complete Guide to Configure Firewall Rules
The iptables command is one of the most powerful and essential tools for managing firewall rules in Linux systems. As...
ip6tables Command Linux: Complete Guide to IPv6 Firewall Management and Security
The ip6tables command is the IPv6 counterpart to the popular iptables firewall utility in Linux. As IPv6 adoption continues to...
nmcli Command Linux: Complete Guide to NetworkManager Command Line Tool
The nmcli (NetworkManager Command Line Interface) is a powerful command-line tool that allows you to control NetworkManager and configure network...
iptables Advanced Linux: Complete Guide to Advanced Firewall Rules and Security Configuration
iptables is the most powerful and flexible firewall solution available for Linux systems, offering granular control over network traffic through...
ping Command Linux: Complete Guide to Test Network Connectivity
The ping command is one of the most fundamental network troubleshooting tools in Linux systems. It sends Internet Control Message...
netstat Command Linux: Complete Guide to Network Connection Monitoring
The netstat command is one of the most essential network monitoring tools in Linux systems. It provides comprehensive information about...
iptraf Command Linux: Complete Interactive Network Monitoring Guide
The iptraf command is a powerful console-based network monitoring utility for Linux systems that provides real-time IP LAN monitoring capabilities....
nm Command Linux: Complete Guide to Display Symbol Tables from Object Files
The nm command is a powerful utility in Linux that displays the symbol table of object files, executables, shared libraries,...
- What is the route Command?
- Basic Syntax and Options
- Viewing the Routing Table
- Adding Routes
- Deleting Routes
- Advanced Examples
- Route Flags Explanation
- Troubleshooting with route Command
- Modern Alternative: ip Command
- Best Practices and Security Considerations
- Common Errors and Solutions
- Migration to ip Command
- Conclusion


