
CSS Width Property: Mastering Element Width
The width property in CSS defines the width of an element’s content area. It’s a fundamental property for controlling the layout and dimensions of elements on a webpage. Understanding how to use the width property is crucial for creating responsive and visually appealing designs. In this comprehensive guide, we’ll explore the syntax, values, and practical examples of the width property, helping you master element sizing in CSS.
What is the width Property?
The width property specifies the width of the content area of an element. The content area is the space within the element where the actual content (text, images, etc.) is displayed. By default, the width property does not include padding, border, or margin.
Purpose of the width Property
The primary purpose of the width property is to:
- Control the horizontal size of an element’s content area.
- Create responsive layouts that adapt to different screen sizes.
- Define the dimensions of specific elements within a design.
- Ensure consistent and visually appealing layouts.
Syntax of the width Property
The width property is defined using the following syntax:
element {
  width: value;
}
Where value can be one of the following:
auto: The browser calculates the width. This is the default value.length: A fixed width specified in px, em, rem, vw, vh, etc.percentage: A width relative to the containing block.initial: Sets the property to its default value (auto).inherit: Inherits the width from its parent element.min-content: The intrinsic minimum width. The element will be as small as possible without overflowing its content.max-content: The intrinsic maximum width. The element will be as wide as possible, fitting all content on a single line.fit-content(length): Uses themax-contentwidth, but if that width is greater than the supplied argument, uses the argument as the width.fill: Makes the content width equal to the available horizontal space.available: Makes the content width equal to the available horizontal space.
Possible Values for width Property
The width property accepts several values, each serving a specific purpose:
| Value | Description |
|---|---|
| `auto` | The browser calculates the width based on the element’s content and context. |
| `length` | Specifies the width as a fixed value using units like pixels (px), ems (em), rems (rem), viewport width (vw), or viewport height (vh). |
| `percentage` | Specifies the width as a percentage of the containing block’s width. |
| `initial` | Sets the width property to its default value, which is `auto`. |
| `inherit` | The element inherits the width value from its parent element. |
| `min-content` | The intrinsic minimum width. The element will be as small as possible without overflowing its content. |
| `max-content` | The intrinsic maximum width. The element will be as wide as possible, fitting all content on a single line. |
| `fit-content(length)` | Uses the `max-content` width, but if that width is greater than the supplied argument, uses the argument as the width. |
| `fill` | Makes the content width equal to the available horizontal space. |
| `available` | Makes the content width equal to the available horizontal space. |
Note: When setting width, remember that the total visible width of an element also includes padding, border, and margin. Use box-sizing: border-box; to include these in the specified width. 💡
Basic Examples of the width Property
Let’s explore some basic examples to understand how the width property works.
Setting a Fixed Width
This example sets a fixed width of 300 pixels to a <div> element.
<div id="fixedWidthDiv" style="width: 300px; border: 1px solid black;">
  This is a div with a fixed width of 300 pixels.
</div>
Setting a Percentage Width
This example sets the width of a <div> element to 50% of its parent element’s width.
<div style="width: 600px; border: 1px solid black;">
  <div id="percentageWidthDiv" style="width: 50%; border: 1px solid red;">
    This is a div with a width of 50% of its parent.
  </div>
</div>
Using width: auto
This example demonstrates the default behavior of width: auto, where the browser calculates the width.
<div id="autoWidthDiv" style="border: 1px solid black;">
  This div has a width of auto, so it fills the available space.
</div>
Using width: initial
This example uses width: initial to reset the width to its default value (auto).
<div id="initialWidthDiv" style="width: 500px; border: 1px solid black;">
  <div style="width: initial; border: 1px solid red;">
    This div has width: initial, resetting it to auto.
  </div>
</div>
Using width: inherit
This example uses width: inherit to inherit the width from the parent element.
<div id="parentWidthDiv" style="width: 400px; border: 1px solid black;">
  <div id="inheritWidthDiv" style="width: inherit; border: 1px solid red;">
    This div inherits its width from the parent.
  </div>
</div>
Advanced Usage and Techniques
Combining width with max-width and min-width
You can combine the width property with max-width and min-width to create more flexible and responsive layouts.
<div
  id="maxWidthDiv"
  style="width: 50%; max-width: 400px; border: 1px solid black;"
>
  This div has a width of 50%, but a max-width of 400px.
</div>
This div has a width of 50%, but a max-width of 400px.
Using width in Responsive Design
The width property is essential for creating responsive layouts. Use percentage widths and media queries to adapt the layout to different screen sizes.
<div id="responsiveWidthDiv" style="width: 80%; border: 1px solid black;">
  This div has a responsive width that adjusts to the screen size.
</div>

<style>
  @media (max-width: 600px) {
    #responsiveWidthDiv {
      width: 100%;
    }
  }
</style>
Using box-sizing for Accurate Width Calculation
To include padding and border in the total width of an element, use the box-sizing property.
<div
  id="boxSizingDiv"
  style="width: 300px; padding: 20px; border: 10px solid black; box-sizing: border-box;"
>
  This div has box-sizing: border-box, so the padding and border are included in the width.
</div>
This div has box-sizing: border-box, so the padding and border are included in the width.
Note: The box-sizing property is extremely useful for simplifying layout calculations. Set it to border-box to make width more intuitive. 👌
Controlling Intrinsic Sizing: min-content, max-content, and fit-content
These values allow you to control how an element sizes itself based on its content.
<div style="border: 1px solid black; margin-bottom: 10px;">
  <div id="minContentDiv" style="width: min-content; border: 1px solid red;">
    VeryLongWordThatShouldNotBreak
  </div>
  <p><code>width: min-content</code>: Shrinks to the smallest width to fit content.</p>
</div>

<div style="border: 1px solid black; margin-bottom: 10px;">
  <div id="maxContentDiv" style="width: max-content; border: 1px solid red;">
    Short phrase
  </div>
  <p><code>width: max-content</code>: Expands to fit all content in one line.</p>
</div>

<div style="border: 1px solid black; margin-bottom: 10px;">
  <div id="fitContentDiv" style="width: fit-content(200px); border: 1px solid red;">
    A medium length phrase that needs to fit within a certain width.
  </div>
  <p><code>width: fit-content(200px)</code>: Uses max-content up to 200px, then constrains to 200px.</p>
</div>
width: min-content: Shrinks to the smallest width to fit content.
width: max-content: Expands to fit all content in one line.
width: fit-content(200px): Uses max-content up to 200px, then constrains to 200px.
These values are beneficial for specific layout scenarios where content-based sizing is important.
Real-World Applications of the width Property
The width property is used extensively in web development for various purposes:
- Layout Design: Creating structured and visually appealing layouts.
- Responsive Design: Adapting layouts to different screen sizes.
- Component Sizing: Defining the dimensions of reusable UI components.
- Image and Media Handling: Controlling the size of images and other media elements.
Browser Support
The width property is supported by all modern web browsers, ensuring consistent behavior across different platforms.
Conclusion
The width property is a fundamental tool in CSS for controlling the size of elements and creating responsive layouts. By understanding its syntax, values, and advanced techniques, you can effectively manage the dimensions of elements and build visually appealing and user-friendly websites. Experiment with different values and combinations to master the width property and enhance your web development skills. 🚀
Related Posts

CSS Style maxWidth Property: CSS Max Width
Understanding the CSS maxWidth Property The CSS maxWidth property is a fundamental tool in web development for controlling the maximum...

CSS Width and Height: Complete Guide to Element Dimensions
Understanding how to control element dimensions is fundamental to creating well-structured web layouts. CSS width and height properties give you...

HTML Element clientWidth Property: Element Width
HTML Element clientWidth Property: Understanding Element Width The clientWidth property is a read-only property of an HTML element that returns...
CSS Style borderWidth Property: CSS Border Width
CSS borderWidth Property: A Comprehensive Guide The borderWidth property in CSS is used to set the width of an element's...
CSS Style minWidth Property: CSS Min Width
CSS min-width Property: Controlling Element Size The CSS min-width property sets the minimum width of an element. It prevents the...
HTML Element scrollWidth Property: Element Scroll Width
Understanding the scrollWidth Property in HTML Elements The scrollWidth property in HTML is a read-only property that returns the total...
CSS Style height Property: CSS Height
Understanding the CSS height Property: A Comprehensive Guide The height property in CSS specifies the height of an element's content...
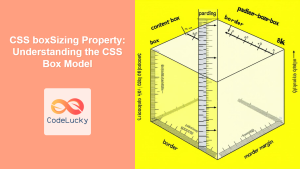
CSS boxSizing Property: Understanding the CSS Box Model
Understanding the CSS boxSizing Property The boxSizing property in CSS is a fundamental tool for controlling how the total width...

HTML Object width Property: Object Width
HTML Object width Property: Mastering Object Width The HTML <object> tag is a versatile element used to embed various types...

CSS Margin: Mastering Spacing in Web Design
CSS Margin: Mastering Spacing in Web Design In CSS, the margin property is fundamental for controlling the space around HTML...

CSS Resize Property: Controlling Element Resizability
Understanding the CSS Resize Property: Controlling Element Resizability The resize property in CSS allows you to control whether (and how)...
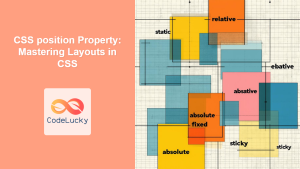
CSS position Property: Mastering Layouts in CSS
Understanding the CSS position Property: A Comprehensive Guide The position property in CSS is a fundamental tool for controlling the...


