Understanding the CSS list-style Property
The list-style property in CSS is a shorthand property used to set the appearance of list items. It allows you to control the type of marker (like bullets or numbers), the position of the marker, and even use an image as the marker. This property is crucial for creating visually appealing and well-structured lists on your web pages.
Purpose of the list-style Property
The primary purpose of the list-style property is to:
- Customize the bullet or number style of list items.
- Define the position of the list marker relative to the content.
- Set an image as the list marker for unordered lists.
- Consolidate multiple list-related properties into a single declaration.
Syntax of the list-style Property
The list-style property can accept one or more of the following values, in any order:
list-style: list-style-type list-style-position list-style-image | inherit | initial | revert | revert-layer | unset;
| Value | Description |
|---|---|
| `list-style-type` | Specifies the type of list marker (e.g., `disc`, `circle`, `square`, `decimal`, `roman`). |
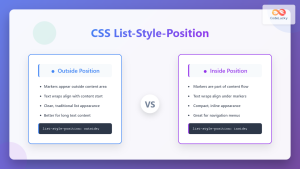
| `list-style-position` | Specifies the position of the list marker relative to the list item’s content (`inside` or `outside`). |
| `list-style-image` | Specifies an image to be used as the list marker. |
| `inherit` | Inherits the `list-style` property from its parent element. |
| `initial` | Sets the property to its default value. |
| `revert` | Reverts the property to the value defined by the user-agent stylesheet. |
| `revert-layer` | Reverts the property to the value defined in a previous cascade layer. |
| `unset` | Resets the property to its inherited value if it inherits from its parent or to its initial value if not. |
Note: Using the shorthand list-style property can simplify your CSS and make it more readable. 🚀
Basic Examples of list-style
Let’s explore some basic examples to understand how the list-style property works.
Example 1: Setting List Style Type
This example demonstrates how to set the type of list marker for an unordered list.
<!DOCTYPE html>
<html>
  <head>
    <title>List Style Type Example</title>
    <style>
      ul.disc {
        list-style-type: disc;
      }
      ul.circle {
        list-style-type: circle;
      }
      ul.square {
        list-style-type: square;
      }
    </style>
  </head>
  <body>
    <h2>Unordered Lists</h2>
    <ul class="disc">
      <li>Coffee</li>
      <li>Tea</li>
      <li>Milk</li>
    </ul>
    <ul class="circle">
      <li>Coffee</li>
      <li>Tea</li>
      <li>Milk</li>
    </ul>
    <ul class="square">
      <li>Coffee</li>
      <li>Tea</li>
      <li>Milk</li>
    </ul>
  </body>
</html>
Output:
- Coffee
- Tea
- Milk
o Coffee
o Tea
o Milk
- Coffee
- Tea
- Milk
Example 2: Setting List Style Position
This example demonstrates how to set the position of the list marker.
<!DOCTYPE html>
<html>
  <head>
    <title>List Style Position Example</title>
    <style>
      ul.outside {
        list-style-position: outside;
      }
      ul.inside {
        list-style-position: inside;
      }
    </style>
  </head>
  <body>
    <h2>List Style Position</h2>
    <ul class="outside">
      <li>Coffee</li>
      <li>Tea</li>
      <li>Milk</li>
    </ul>
    <ul class="inside">
      <li>Coffee</li>
      <li>Tea</li>
      <li>Milk</li>
    </ul>
  </body>
</html>
Output:
-
Coffee
-
Tea
-
Milk
-
Coffee
-
Tea
-
Milk
Note: The inside value can be particularly useful for creating hanging indents. 💡
Example 3: Setting List Style Image
This example demonstrates how to use an image as a list marker.
<!DOCTYPE html>
<html>
  <head>
    <title>List Style Image Example</title>
    <style>
      ul {
        list-style-image: url('https://cdn-icons-png.flaticon.com/128/1160/1160239.png');
      }
    </style>
  </head>
  <body>
    <h2>List with Image Markers</h2>
    <ul>
      <li>Coffee</li>
      <li>Tea</li>
      <li>Milk</li>
    </ul>
  </body>
</html>
Output:
- Coffee
- Tea
- Milk
Example 4: Using Shorthand list-style
This example demonstrates how to use the shorthand list-style property to set multiple values at once.
<!DOCTYPE html>
<html>
  <head>
    <title>Shorthand List Style Example</title>
    <style>
      ul {
        list-style: square inside url('https://cdn-icons-png.flaticon.com/128/1160/1160239.png');
      }
    </style>
  </head>
  <body>
    <h2>List with Shorthand Style</h2>
    <ul>
      <li>Coffee</li>
      <li>Tea</li>
      <li>Milk</li>
    </ul>
  </body>
</html>
Output:
- Coffee
- Tea
- Milk
Advanced Examples of list-style
Example 5: Styling Ordered Lists
This example demonstrates how to style ordered lists with different types of numbering.
<!DOCTYPE html>
<html>
  <head>
    <title>Ordered List Style Example</title>
    <style>
      ol.decimal {
        list-style-type: decimal;
      }
      ol.lower-roman {
        list-style-type: lower-roman;
      }
      ol.upper-alpha {
        list-style-type: upper-alpha;
      }
    </style>
  </head>
  <body>
    <h2>Ordered Lists</h2>
    <ol class="decimal">
      <li>Coffee</li>
      <li>Tea</li>
      <li>Milk</li>
    </ol>
    <ol class="lower-roman">
      <li>Coffee</li>
      <li>Tea</li>
      <li>Milk</li>
    </ol>
    <ol class="upper-alpha">
      <li>Coffee</li>
      <li>Tea</li>
      <li>Milk</li>
    </ol>
  </body>
</html>
Output:
- Coffee
- Tea
- Milk
i. Coffee
ii. Tea
iii. Milk
A. Coffee
B. Tea
C. Milk
Example 6: Combining list-style with Other CSS Properties
This example demonstrates how to combine list-style with other CSS properties to create a more visually appealing list.
<!DOCTYPE html>
<html>
  <head>
    <title>Combined List Style Example</title>
    <style>
      ul {
        list-style: square inside;
        padding: 0;
        margin: 20px;
        background-color: #f0f0f0;
        border: 1px solid #ccc;
      }
      li {
        padding: 10px;
        border-bottom: 1px solid #ddd;
      }
      li:last-child {
        border-bottom: none;
      }
    </style>
  </head>
  <body>
    <h2>Styled List</h2>
    <ul>
      <li>Coffee</li>
      <li>Tea</li>
      <li>Milk</li>
    </ul>
  </body>
</html>
Output:
- Coffee
- Tea
- Milk
Note: Combining list-style with other CSS properties allows for greater customization and visual appeal. ✨
Real-World Applications of the list-style Property
The list-style property is used in various scenarios, including:
- Navigation Menus: Styling navigation menus with custom bullet points or no bullets at all.
- To-Do Lists: Creating visually distinct to-do lists with checkboxes or other markers.
- Article Outlines: Structuring article outlines with different levels of numbering or bullet points.
- Product Listings: Displaying product features or specifications in an organized list format.
Use Case Example: Creating a Custom Navigation Menu
Let’s create a practical example that demonstrates how to use the list-style property to build a custom navigation menu.
<!DOCTYPE html>
<html>
  <head>
    <title>Custom Navigation Menu</title>
    <style>
      nav ul {
        list-style-type: none; /* Remove default bullets */
        margin: 0;
        padding: 0;
        background-color: #333;
        overflow: hidden;
      }
      nav li {
        float: left;
      }
      nav li a {
        display: block;
        color: white;
        text-align: center;
        padding: 14px 16px;
        text-decoration: none;
      }
      nav li a:hover {
        background-color: #ddd;
        color: black;
      }
    </style>
  </head>
  <body>
    <nav>
      <ul>
        <li><a href="#">Home</a></li>
        <li><a href="#">About</a></li>
        <li><a href="#">Services</a></li>
        <li><a href="#">Contact</a></li>
      </ul>
    </nav>
  </body>
</html>
Output:
This example demonstrates how to use list-style-type: none to remove the default bullets from a list, allowing you to create a custom navigation menu with styled links.
Browser Support
The list-style property is widely supported across all modern web browsers.
Note: Always test your CSS code in different browsers to ensure consistent rendering. 🧐
Conclusion
The list-style property in CSS is a powerful tool for customizing the appearance of lists on your web pages. By understanding its syntax and various values, you can create visually appealing and well-structured lists that enhance the user experience. Whether you’re creating navigation menus, to-do lists, or article outlines, the list-style property provides the flexibility you need to achieve your design goals. Happy styling!

