Understanding the CSS clear Property: Mastering Layout Control
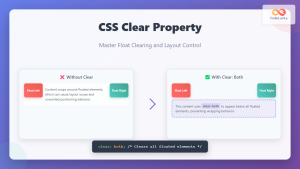
The clear property in CSS is a powerful tool for controlling the placement of elements in relation to floated elements. It specifies on which sides of an element floating elements are not allowed. Understanding and effectively using the clear property is essential for creating predictable and well-structured web layouts.
Purpose of the clear Property
The primary purpose of the clear property is to prevent an element from appearing next to a floated element. It is commonly used to:
- Force an element to appear below a floated element.
- Prevent content overlapping with floats.
- Improve the readability and structure of complex layouts.
Syntax of the clear Property
The clear property is specified as one of the following values:
clear: none | left | right | both | inline-start | inline-end;
Possible Values for the clear Property
| Value | Description |
|---|---|
| `none` | The element is not cleared and can appear next to floating elements. This is the default value. |
| `left` | The element is moved below any left-floated elements. |
| `right` | The element is moved below any right-floated elements. |
| `both` | The element is moved below any left- and right-floated elements. |
| `inline-start` | The element is moved below any floating element on the start side (left in LTR, right in RTL). |
| `inline-end` | The element is moved below any floating element on the end side (right in LTR, left in RTL). |
Basic Examples of the clear Property
Let’s explore some basic examples to demonstrate how the clear property works.
Example 1: Clearing Left-Floated Elements
In this example, we have a left-floated div and a paragraph that is cleared to ensure it appears below the floated element.
<div style="float: left; width: 150px; height: 100px; background-color: lightblue;">
  Float Left
</div>
<p style="clear: left;">
  This paragraph is cleared to the left, so it appears below the floated div.
</p>
The paragraph will start below the floated div.
Example 2: Clearing Right-Floated Elements
Here, we have a right-floated div and a paragraph that is cleared to the right.
<div style="float: right; width: 150px; height: 100px; background-color: lightcoral;">
  Float Right
</div>
<p style="clear: right;">
  This paragraph is cleared to the right, so it appears below the floated div.
</p>
The paragraph will start below the floated div on the right.
Example 3: Clearing Both Left- and Right-Floated Elements
In this example, we have both left- and right-floated div elements, and a paragraph that is cleared on both sides.
<div style="float: left; width: 100px; height: 80px; background-color: lightgreen;">
  Float Left
</div>
<div style="float: right; width: 100px; height: 80px; background-color: lightsalmon;">
  Float Right
</div>
<p style="clear: both;">
  This paragraph is cleared on both sides, so it appears below both floated divs.
</p>
The paragraph will start below both the left- and right-floated div elements.
Practical Use Cases of the clear Property
Use Case 1: Creating a Multi-Column Layout
The clear property can be used to create multi-column layouts where specific elements need to break out of the column structure.
<div style="float: left; width: 30%; background-color: lightyellow; height: 200px;">
  Column 1
</div>
<div style="float: left; width: 30%; background-color: lightcyan; height: 200px;">
  Column 2
</div>
<div style="float: left; width: 30%; background-color: lightpink; height: 200px;">
  Column 3
</div>
<div style="clear: left;"></div>
<p>
  This paragraph is cleared to the left, ensuring it starts below the columns.
</p>
The paragraph will start below the three floated columns.
Use Case 2: Clearing Floats Within a Container
When floating elements within a container, the container might not expand to fully enclose the floated elements. The clear property can be used to address this issue.
<div style="border: 1px solid black;">
  <div style="float: left; width: 100px; height: 80px; background-color: lightseagreen;">
    Float Left
  </div>
  <div style="clear: both;"></div>
</div>
Adding an empty div with clear: both inside the container ensures that the container expands to enclose the floated element.
Use Case 3: Preventing Overlapping Elements
The clear property can prevent elements from overlapping with floated elements, ensuring a clean and readable layout.
<div style="float: left; width: 150px; height: 120px; background-color: lightgoldenrodyellow;">
  Float Left
</div>
<h2 style="clear: left;">
  This Heading is Cleared
</h2>
<p>
  This paragraph is cleared to the left, ensuring it starts below the floated div.
</p>
The heading and paragraph will start below the floated div, preventing any overlap.
Advanced Techniques with the clear Property
Clearing with overflow
The overflow property can also be used to clear floats. Setting overflow: auto or overflow: hidden on a container will cause it to enclose floated elements.
<div style="border: 1px solid black; overflow: auto;">
  <div style="float: left; width: 100px; height: 80px; background-color: lightcoral;">
    Float Left
  </div>
</div>
The container will expand to enclose the floated div.
The Clearfix Hack
The “clearfix hack” is a popular technique for ensuring that a container encloses floated elements. It involves using pseudo-elements (::before and ::after) to clear the floats.
<style>
  .clearfix::after {
    content: "";
    display: table;
    clear: both;
  }
</style>

<div class="clearfix" style="border: 1px solid black;">
  <div style="float: left; width: 100px; height: 80px; background-color: lightblue;">
    Float Left
  </div>
</div>
The container with the clearfix class will enclose the floated div.
Common Mistakes to Avoid
- Forgetting to Specify the Clear Side: Always specify which side (
left,right, orboth) to clear, or the property might not have the desired effect. - Applying
clearto Floated Elements: Theclearproperty should be applied to the element that you want to move below the float, not to the floated element itself. - Over-reliance on
clear: Whileclearis useful, consider using modern layout techniques like Flexbox or Grid for more complex layouts.
Best Practices for Using the clear Property
- Use
clearWhen Necessary: Only use theclearproperty when you need to control the placement of elements around floats. - Consider Modern Layout Techniques: For more complex layouts, consider using Flexbox or Grid, which provide more flexible and powerful layout options.
- Test Across Browsers: Always test your layouts across different browsers to ensure consistent rendering.
Browser Support
The clear property is well-supported across all modern web browsers.
Conclusion
The clear property in CSS is an essential tool for controlling the placement of elements in relation to floated elements. By understanding its syntax, values, and practical use cases, you can create predictable and well-structured web layouts. Whether you are creating multi-column layouts, clearing floats within containers, or preventing overlapping elements, the clear property provides the control you need to achieve your desired layout.
- Understanding the CSS clear Property: Mastering Layout Control
- Purpose of the clear Property
- Syntax of the clear Property
- Possible Values for the clear Property
- Basic Examples of the clear Property
- Practical Use Cases of the clear Property
- Advanced Techniques with the clear Property
- Common Mistakes to Avoid
- Best Practices for Using the clear Property
- Browser Support
- Conclusion

